
Click on one of the following links to find answers to the most common questions about digital manufacturing.
Use these 3D printing FAQs to learn more about 3D printing tolerances, the materials we offer, and more.
Q: What is additive manufacturing?
A: Additive manufacturing is a process that creates physical objects from digital models. While traditional machining (or subtractive) methods fabricate parts by removing material, additive manufacturing builds the part up by adding material layer by layer.
Q: Can I finish and paint 3D printed parts?
A: Yes! Each process is a little different, but you can create custom finishes on your parts. We do a whole range of finishes, including clear, painted (matte, gloss, etc.), texture, labels, metalizing, and plating. Most processes do require some sanding to remove the build layer lines if you want to get a show or production finish quality.
Q: Should I print threads or use inserts?
A: Again, each is dependent on the material and process you use, but we recommend using heat staked inserts whenever possible to ensure a great threaded fit between your part and the screw. If you need threads in your part, we recommend printing the threads in the parts, then we will chase the threads in finishing to ensure they work.
Q: Rapid prototyping vs. 3D printing: What’s the difference?
A: 3D printing, or additive manufacturing, is the process of building parts by joining material layer by layer from a CAD file. This is unlike a traditional manufacturing process, like CNC machining, where a part is built by subtracting material from a block of material. 3D printing and additive manufacturing can be used regardless of whether the parts are fabricated in plastic, metal, or rubber.
Rapid prototyping is the technique of fabricating a prototype model from a CAD file. In other words, 3D printing/additive manufacturing is the process and rapid prototyping is the end result. Rapid prototyping is also used to describe any prototype parts that are needed ASAP, including urethane casting, injection molding, and CNC machining. 3D printing is just one of many applications under the rapid prototyping umbrella.
Q: What file format do I need in order to fabricate my parts?
A: The process of 3D printing begins with a 3D CAD model. After the 3D model is created, it’s exported as an STL file. If an STL file isn’t available, multiple engineering programs can be used to export an STL file. The most common programs are STEP, IGES, Parasolid, Catia, SolidWorks, and Creo (ProE).
Q: How large of parts can be made?
A: Technically, you can build a part of any size. This is due to 3D printing’s ability to make parts in sections. Using the latest 3D printing software, we can create special cut patterns, like puzzle pieces, to seamlessly align and bond parts back together during the post-processing. We have made parts as large as six feet in diameter.
Q: Can you glue 3D printed parts?
A: Yes. It is very common to section and bond parts in 3D printing to make large parts or fix those prototypes that may get chipped over time. We usually use super glue or a Loctite two-part epoxy.
Q: What is the minimum thickness required?
A: The minimum thickness can vary based on the material, machine, and process, but most processes require a minimum thickness of .025” to .030”. Softer materials will require a thickness of at least .040”. Smaller features, walls, and geometries can be built but are geometry or build orientation dependent. Keep in mind that most 3D printing processes require some finishing and small, thin features are more delicate and take a lot of care to survive printing, processing, and shipping.
Q: What tolerances are 3D printers capable of holding?
A: Tolerances are a function of the process, material, geometry, and the overall size of the part. Here is our standard tolerancing:
Q: In what ways can I reduce 3D printing costs?
A: There are multiple ways to save on 3D printing and additive manufacturing costs. Here are the most common:
From design to prototype and production, our team of engineers is ready to help bring your idea to life.

Use these CNC machining FAQs to learn more about processes as well as prototyping and production options.
Q: What is a 5-axis CNC machine?
A: 5-axis machining involves using a CNC to move a cutting tool or part on five different axes simultaneously. 5-axis CNC machining provides a variety of advantages over the more common 3-axis machining:
Q: Do you provide any secondary processes for production?
A: Yes, most prototype and production parts require some type of custom finish, whether it is anodizing, painting, plating, or assembly. If we do not do it in-house, we have medical and aerospace approved partners that support all MIL specs for all industries.
Q: What are your typical lead times for CNC machining?
A: All projects are dependent on customer needs, material availability, capacity, and complexity. We pride ourselves on a flexible workforce willing to react when needed, so many times we can expedite projects as needed. Here are typical lead times:
Check out these injection molding FAQs to learn more about tooling options and volumes offered.
Q: What is the difference between hard and soft tooling?
A: Soft tooling is typically considered prototype tooling and uses aluminum tools. This is used to get parts quickly for production testing from the final materials and to test the design. Tools are usually only good for a couple thousand parts. Hard tooling is considered production tooling. Usually, tools are created using steel for better tolerancing, repeatable cycles, reduced cycle times, and better tool life. We use both tooling methods depending on project requirements.
Q: What is rapid tooling?
A: This is a common term for prototype tooling. For us, we will create prototype aluminum tooling that will be good for a couple thousand parts in 3-4 weeks. We also can create rapid 3D printed tools that are typically good for small parts, with low heat materials and low volumes of 10-100 parts in 1-2 weeks.
Q: What is MUD or insert set tooling?
A: MUD or insert set tooling are modular tools where the core and cavity are created in different sizes that fit into standard MUD bases. They can be aluminum or steel. This is to reduce mold build times, material costs, setup time, and inventory space. This type of tooling is used for smaller- to medium-sized parts, but good for all different quantities.
Q: What is the difference between a handload and a slide?
A: A handload or a slide are pieces of a tool that are needed to create the features that are not in the line of draw when trying to open a tool. In both cases, the tool sections must be removed from the tool before the tool can open.
With a handload, the operator must physically remove the tool section themselves to open and close a tool for molding. Handloads should be easily handled and should not be too large or heavy. Using handloads in tools is a great way to reduce tool cost, but part cost increases with longer cycle times. This is a good option for prototype, bridge, and low-volume tools for smaller- or medium-sized parts.
With a slide, this function of the molding process is done automatically without labor. Slides in tools increase initial tool costs but reduce costs in the long run by cutting cycle times and risk of issues with operator handling. Use slides in your tools when you want to reduce risk, piece prices, and/or for consistent high volumes.
Q: How many parts can you make from an injection mold tool?
A: This varies based on multiple factors, including mold type, mold material, part material, and part geometry. As a standard:
Q: What is overmolding?
A: Overmolding is the process in which we mold a plastic part “over” a substrate part. The substrate part is typically a rigid part in either plastic or metal. We then “overmold” an elastomeric or rigid material onto or around the substrate. Examples of this are rigid handles with soft grips. To do this, we would create two separate tools, one tool for the substrate and the other tool for the overmold. These can be in the same tool or different tools but must be separate cavities.
Q: What volumes can you mold?
A: We are set up as a flexible, custom injection molding facility with the ability to do multiple mold changes in a day. That said, we do injection molding volumes anywhere between 25 to over a million parts per year.
Q: When should I use injection molding?
A: Injection molding is best for high-volume production for low-cost parts. Consistent, repeatable parts and processing is required and chances of design changes are low.
Here are some urethane casting FAQs to help you learn more about the process, uses, and finishes.
Q: What kind of molds are used in urethane casting?
A: Our typical molds are made from silicone and made in two parts, a core and cavity, just like injection mold tooling. We create a 3D printed master pattern (or use provided masters) then create the mold by pouring the silicone around the master after setup, which includes creating parting lines and venting and gating schemes. Depending on requirements, we can also produce tooling with urethane, aluminum, ren board, or even 3D printing.
Q: How many parts do you guarantee?
A: Twenty-five parts per mold per cavity is standard. Again, everything is material and geometry dependent, so more or fewer parts are possible. If a project is going to be a repeat production project, volumes per mold cavity can get higher if geometries, material, and tolerancing are standard.
Q: Can you create multi-cavity molds or family molds?
A: Just like injection molding, we can make multiple cavities of the same part in the same mold, or we can put multiple parts in the same mold. This allows us to set up, pour the parts, and demold all the parts at the same time using the same material. This is a good option for production or quick-turn prototypes.
Q: Can you use urethane castings for production?
A: Yes, 50% of our urethane casting projects end up as end-use parts, bridge production, or final repeat production. Urethane is a great option when building up product demand before spending big bucks on injection mold tooling.
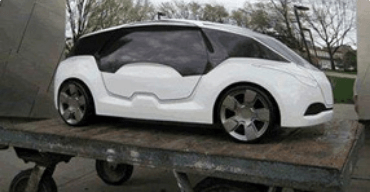
See how we partnered with Vitamix and Carbon to redefine what's possible. We took a legacy, six-piece, injection-molded part design and turned it into a new, one-piece, 3D-printed part.
Our experts have a proven history of providing innovative solutions at every stage of product development—from product design through production.

TTH’s integrated approach to design, prototyping, and production allows you to bring your concept to market faster, more cost-effectively, than virtually anyone else.
Headquarters
10036 Aurora-Hudson Road
Streetsboro, OH 44241
The Technology House:


.png)


© 2026 The Technology House | Website by SyncShow | Privacy Policy